Executable File Is Not Found. Clear Command Option in the Launcher Settings and Try Again
The Minecraft launcher may show the 'Internal Exception Java.IO.IOException' issue if the Minecraft installation is corrupt or outdated. Moreover, the corrupt DNS cache of the organisation or improper configuration of Java may as well crusade the result at hand.
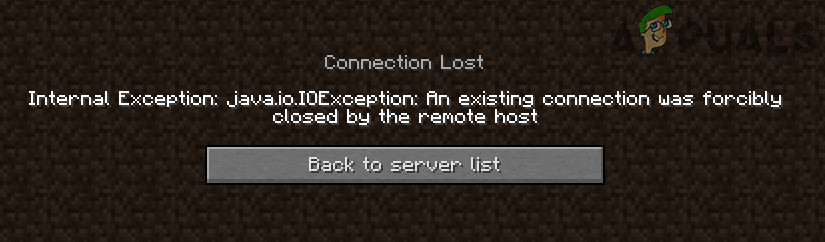
The issue arises when the user tries to bring together or connect a server merely encounters the following message:
"Connection Lost Internal Exception: java.io.IOException: An existing connection was forcibly closed by the remote host"
Before proceeding with the solutions to terminate internal exceptions in Java IO IOException, cheque if trying another network cable (if using an ethernet connectedness) resolves the issue. If yous accept a long username (vii+ characters), and so check if reducing it to (7 or fewer characters) solves the issue. Too, check if your internet speed meets the minimum speed requirements of Minecraft. Moreover, make certain to log out/disconnect the Minechat (if using) and then close it. Additionally, check if launching the Minecraft launcher (or server) as an ambassador resolves the consequence.
Repair Decadent Files
Download and run Restoro to browse and restore corrupt and missing files fromhere. Once done, proceed with the solutions below.
Solution ane: Update the Minecraft Launcher to the Latest Build
You may encounter the internal exception issue if the Minecraft launcher of your system is outdated equally information technology tin can create incompatibility betwixt the launcher & server. In this context, updating the Minecraft launcher to the latest release may solve the trouble. But before moving on, check if yous have more than i account configured with the Minecraft launcher, if then, then remove all the other accounts but one.
- Open the Minecraft launcher & near the username, click on the Options.
- And so click on the Strength Update push & apply the launcher update.
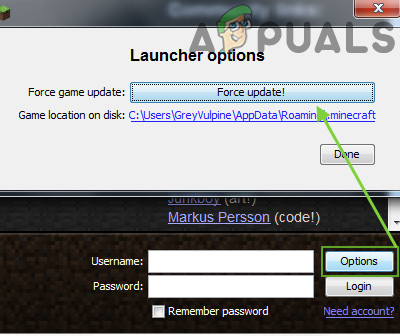
Force Update the Minecraft Launcher - Once updated, relaunch the Minecraft launcher and check if it is clear of the IOexception fault.
- If not, bank check if using another launcher resolves the consequence.
Solution 2: Clear the DNS Cache of Your System
The Java.io error may emerge if the DNS cache of your system is decadent every bit information technology may lead to the arrangement's power to resolve the domain name. In this context, flushing the DNS cache (which volition strength the organization to re-fetch the combinations) may solve the problem.
- Click Windows, type: Command Prompt, and right-click on the result of Control Prompt. And so choose Run as Administrator.

Open up Command Prompt as Administrator - Now execute the following ane by one:
ipconfig /flushdns ipconfig /release ipconfig /renew

Flush the DNS Enshroud - Then go out the Command Prompt and check if the Java exception upshot is resolved.
If the issue persists, so bank check if changing DNS server (e.g., Google DNS) resolves the internal exception issue.
Solution iii: Disable Server's Resource Pack
Resource packs permit the players to practise a lot of customization (like textures, music, models, splash tests, etc.) but this customization may hinder the customer/server communication and thus cause the IOexception issue. In this scenario, disabling the server's resource pack may solve the trouble.
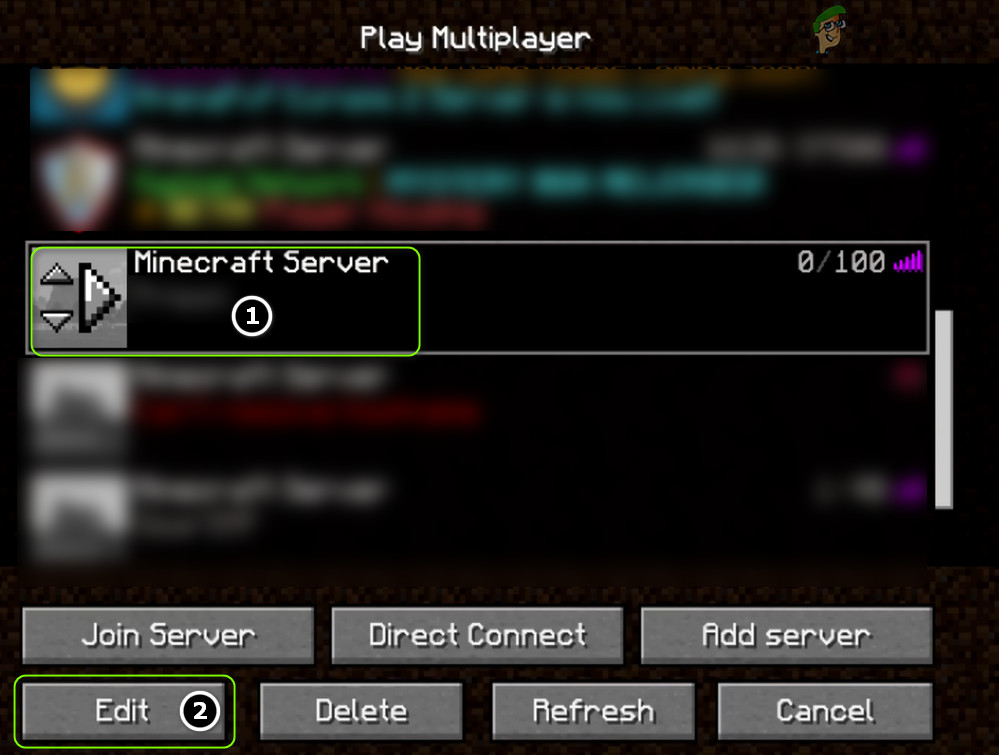
- Open up the Minecraft launcher and select Multiplayer.
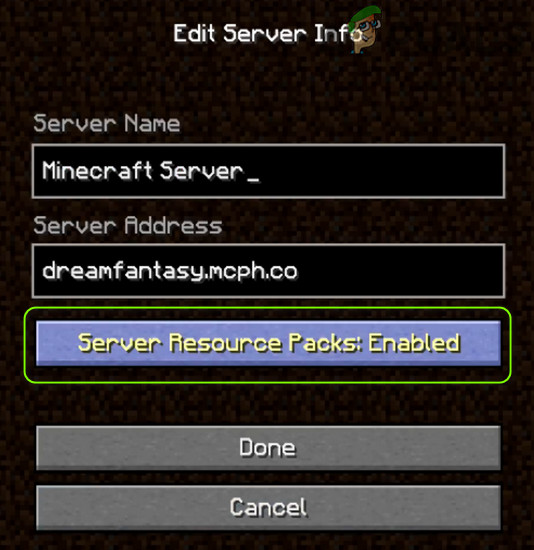
- So select the problematic server and click on Edit.
Edit the Minecraft Server Backdrop - Now click on Server Resource Packs to set it to Disabled (if enabled) and click on Done.
Disable Server Resource Packs in Minecraft - Then check if the launcher is clear of the Coffee.io issue.
Solution 4: Uninstall the Conflicting Applications
Yous may encounter the Java.io effect if an application on your organisation is hindering the operation of Minecraft. In this scenario, removing the conflicting application may solve the problem. You can clean kicking your PC to find out the problematic application. For illustration, we will hash out the procedure for the Hamachi VPN (reported past the users to crusade the upshot).
- Right-click Windows & open up Apps and Features.
- Now click on LogMeIn Hamachi to expand information technology & then click on Uninstall.
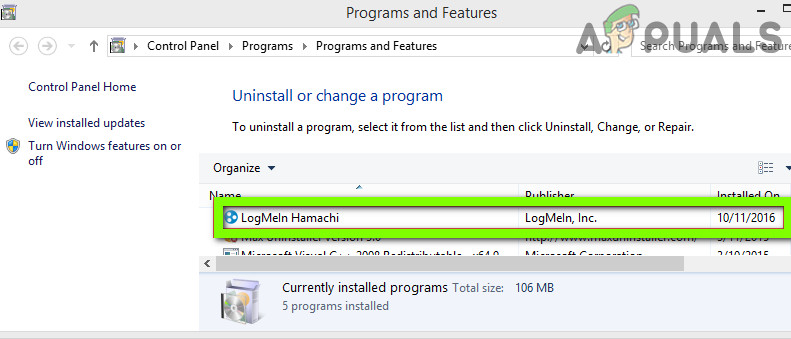
Uninstall Hamachi - Then follow the prompts to remove Hamachi & reboot your PC.
- Upon reboot, bank check if the IOexception issue is resolved.
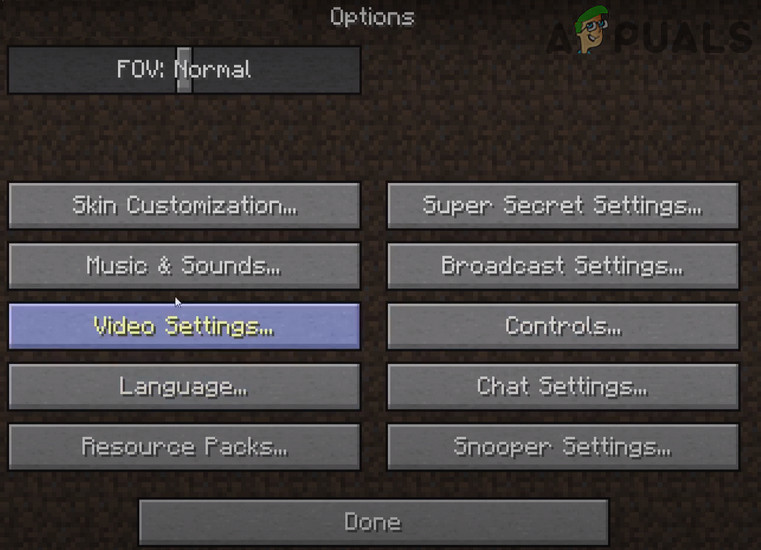
Solution v: Decrease the Render Distance in the Minecraft Settings
The internal exception issue may arise if Minecraft could non render all the video blocks at once (due to the poor net speed). In this context, decreasing the Return Distance in the Minecraft settings to the everyman possible may solve the trouble.
- Open the Minecraft Launcher & open up its Options (it will be besides a good idea to lower the Render Distance in the server settings, if possible).

Open up the Minecraft Options - At present select Video Settings & slide the Render Distance to the lowest possible (due east.g., to 2).
Open Video Settings of Minecraft - Then check if the Java.io issue is resolved. If then, so you may increase the Render Altitude by i till yous reach your desired Return Distance.
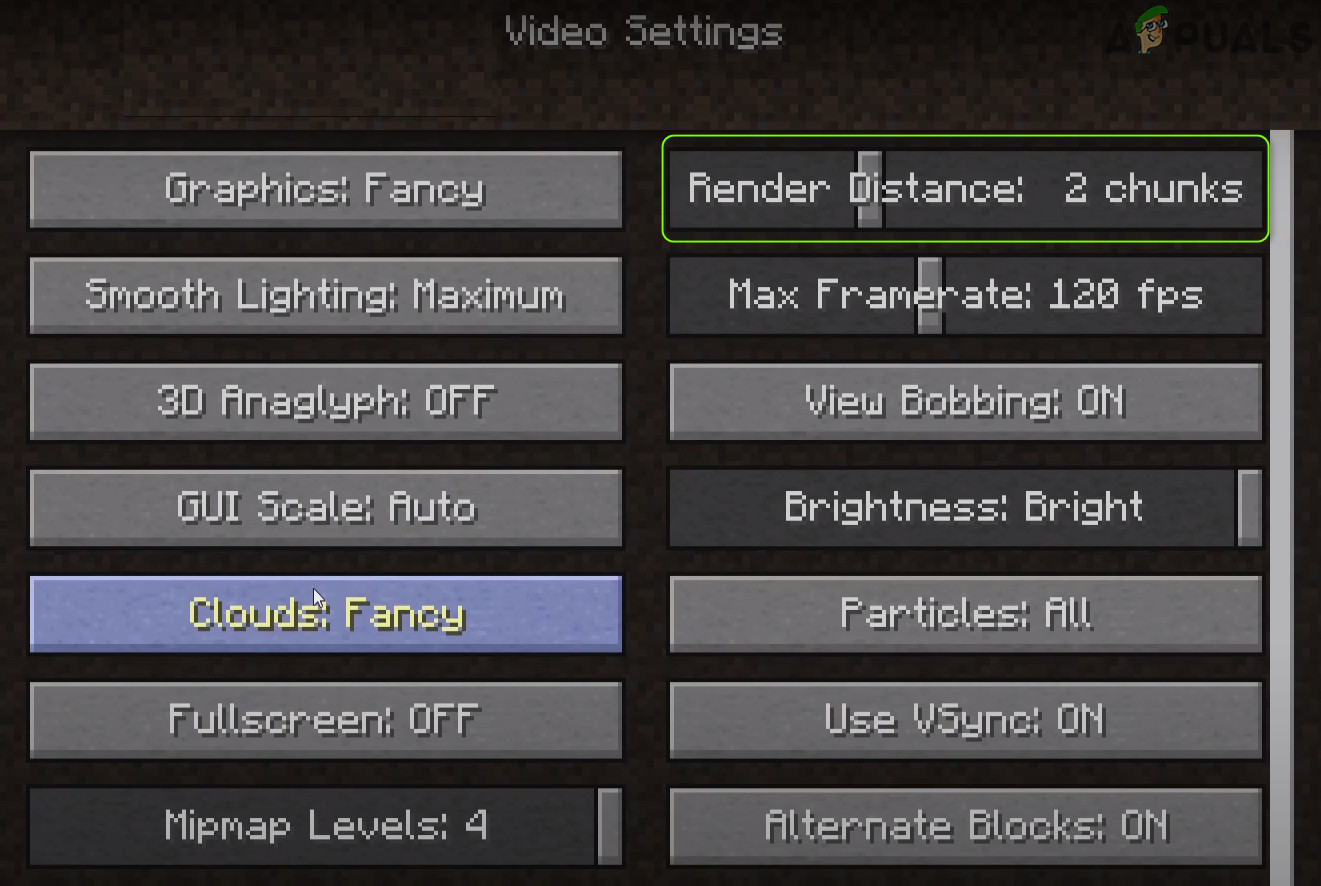
Gear up Return Distance to 2 Chunks in Minecraft
Solution 6: Edit the Java Settings
The Coffee.io error may arise if the Java installation of your system is not properly configured. In this context, editing the Coffee settings (like enabling the Native Sandbox) may solve the problem. Just before proceeding, make certain you have but one Java installation.
Update Java to the Latest Build
- Click Windows, type: Configure Coffee & then open it.
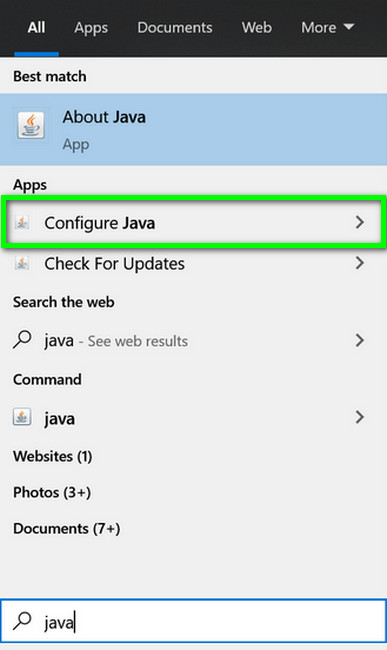
Open Configure Java - Now steer to the Update tab & click on the Update Now button.
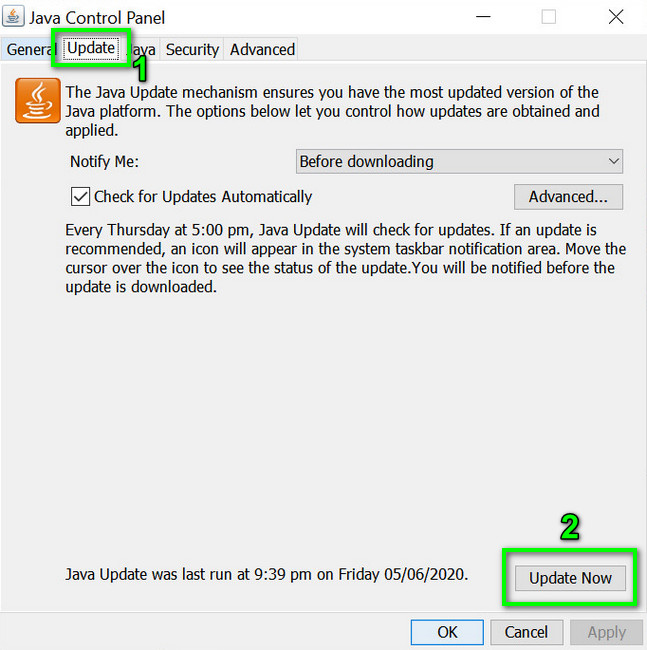
Click Update Java in the Update Tab - If an update is available, utilise the Coffee update & check if the internal exception issue is resolved.
Enable Native Sandbox
- Click Windows, type: Configure Coffee & open it.
- Now steer to the Advanced tab & checkmark Enable the Operating Organisation'southward Restricted Environment (Native Sandbox).
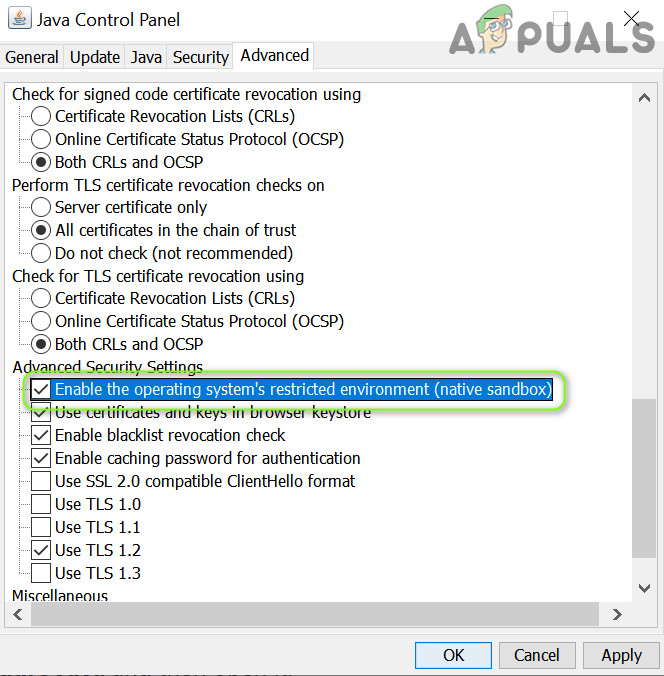
Enable the Operating System's Restricted Environment (Native Sandbox) - And then utilize your changes & reboot your PC.
- Upon reboot, check if the Minecraft IOexception consequence is resolved.
Edit the Java Path in the Launcher Settings
- Right-click Windows & open up Run.
- Now navigate to the following path:
\Programme Files (x86)\

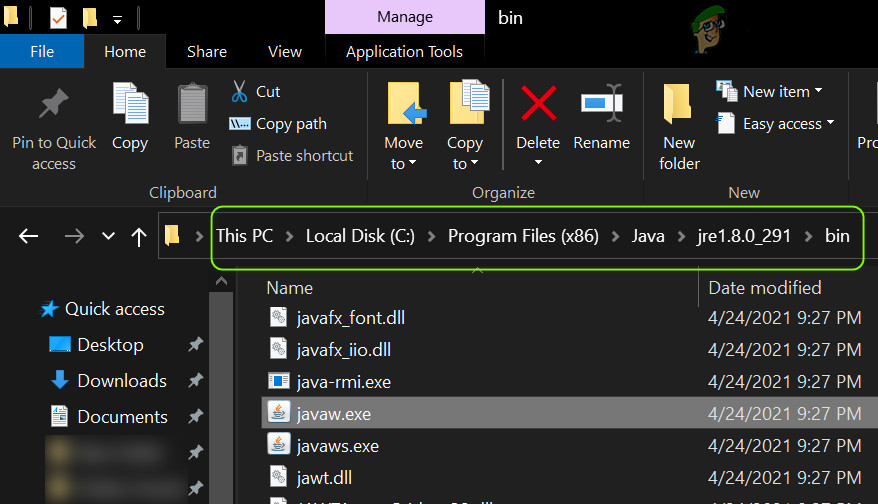
Open Program Files (x86) From Run - Then open the Java binder & steer to the latest version of the Java installation (due east.g., the jre1.8.0_291 binder).
- Now open the Bin folder & re-create the address from the accost bar.
Copy the Coffee Path - And so open up the Minecraft Launcher & select Edit Contour.
- At present, nether Java Settings (Advanced), checkmark the option of Executable.
- And so paste the accost (copied at step 4) up to Bin, so the path should exist something like beneath:
C:\Program Files (x86)\Coffee\jre1.eight.0_291\bin\javaw.exe
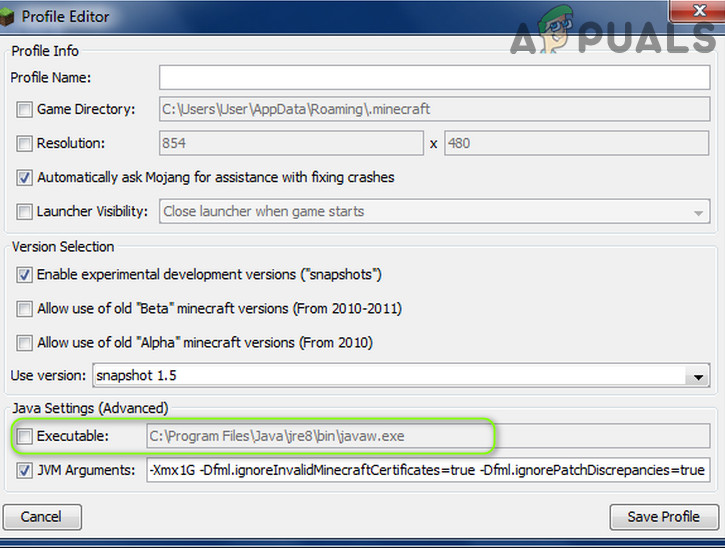
Edit the Java Path in the Minecraft Contour Editor - Now use your changes & cheque if the internal exception consequence is resolved.
If the consequence persists, and then cheque if reinstalling Java sorts out the IOexception result.
Solution 7: Repair / Reinstall the Minecraft
The Coffee.io event may ascend if the Minecraft installation is corrupt. In this context, repairing or reinstalling it may solve the problem.
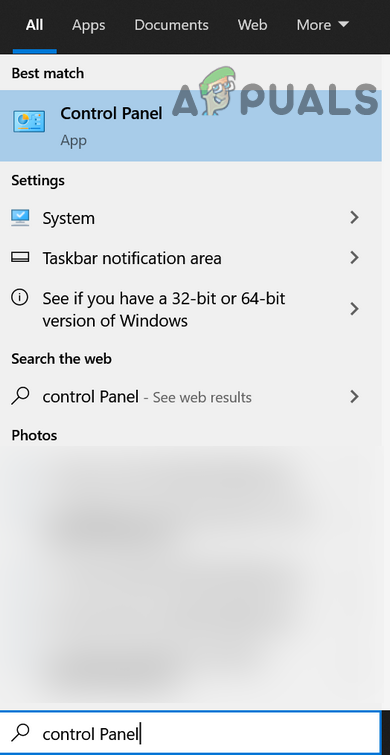
- Click Windows, type: Control Console, & launch it.
Open Command Panel - Now open up Uninstall a Plan & select Minecraft.
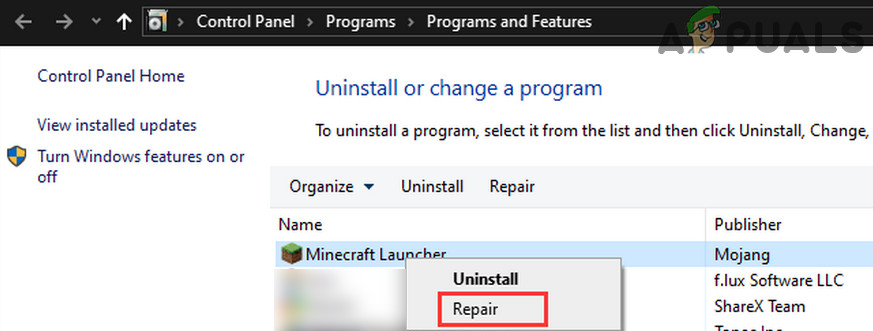
Repair the Minecraft Launcher - So click on Repair & follow the prompts to repair Minecraft.
- At present reboot your PC & cheque if the IOexception issue is resolved.
- If not, uninstall Minecraft & Java (make certain to back up the essentials).
- Now reboot your PC & upon reboot, right-click Windows & select Run.
- And so navigate to the following path (copy-paste the address):
AppData
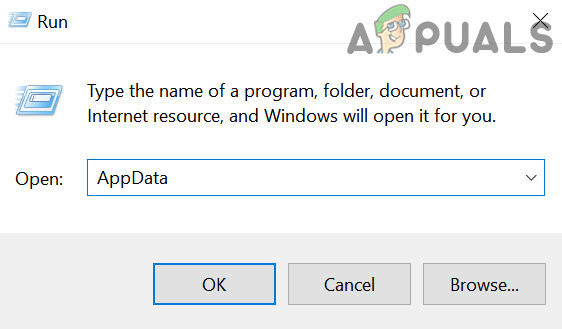
Open AppData Through the Run Box - Now open up each directory (Local, LocalLow, & Roaming) i by ane & delete the Minecraft folders in them.
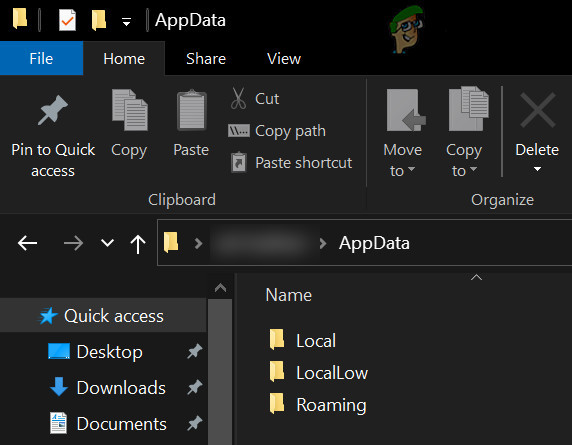
Delete the Minecraft Directories in the AppData Folders - And then download the latest versions of Java & Minecraft.
- Then install Java as administrator & reboot your PC.
- Upon reboot, install Minecraft every bit administrator & check if the internal exception issue is resolved.
Solution 8: Edit the Network-Related Settings
Minecraft may show the internal exception issue if the network settings of your organization are not properly configured (or your ISP is blocking access to a resource essential for the operation of Minecraft). In this case, editing the network settings (or trying another network/VPN) may solve the trouble.
Try Some other Network or a VPN
- Disconnect your arrangement from the current network & connect to another network east.g., the hotspot of your phone to check if the IOexception outcome is resolved. You can also bank check past using a VPN. As well, it volition be a good thought to switch between the Wi-Fi and ethernet connection.
- If the issue persists, directly connect the system to the internet without the router to rule out if its configuration causing the issue.
Disable NAT Acceleration in the Router's Settings
- Launch a web browser & navigate to the Router's control page.
- Now select LAN (in the left pane) & disable Hardware Accelerationin the Switch Control tab. If the Hardware Acceleration (the Asus branded router feature) is not shown, expect for it with different names like CTF (Cut-Through Forwarding) & FA (Flow Accelerator).
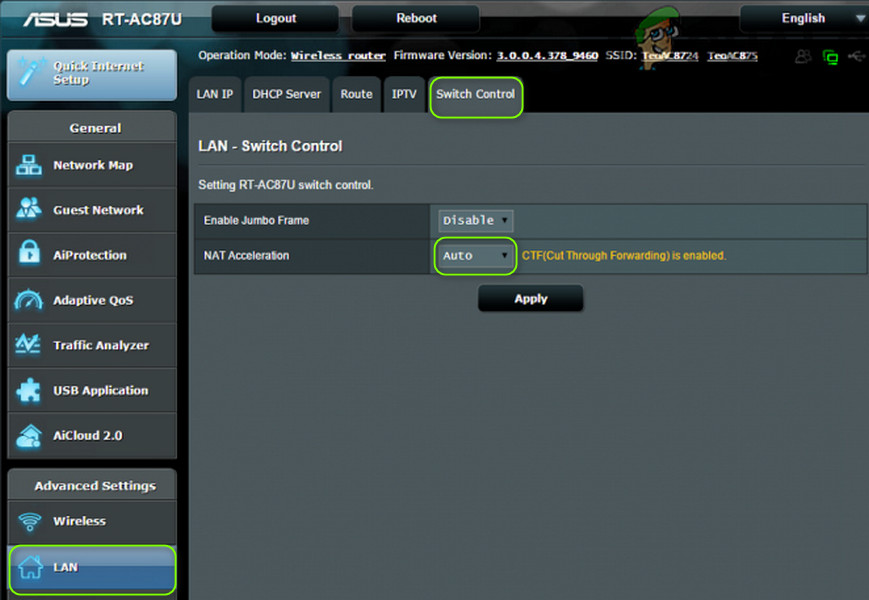
Disable NAT Acceleration - Then apply your changes & check if the internal exception issue is resolved.
Solution 9: Edit the Firewall Settings
You may come across the internal exception upshot if the Firewall of your system is blocking access to a resource essential for the functioning of Minecraft. In this context, editing the Firewall settings (like assuasive Java (TM) Platform SE Binary in the Firewall settings) may solve the problem. Before proceeding, it will exist a good idea to check if temporarily disabling the firewall of your system resolves the issue. For illustration, nosotros will go through the procedure for the Windows Defender Firewall.
Warning: Advance at your own risk as editing the firewall's settings is a proficient job & if washed incorrect, you may expose your system/data to threats.
Prepare Java (TM) Platform SE to Private in the Firewall Settings
- Click Windows, type: Allow an App Through Windows Firewall, & open it.
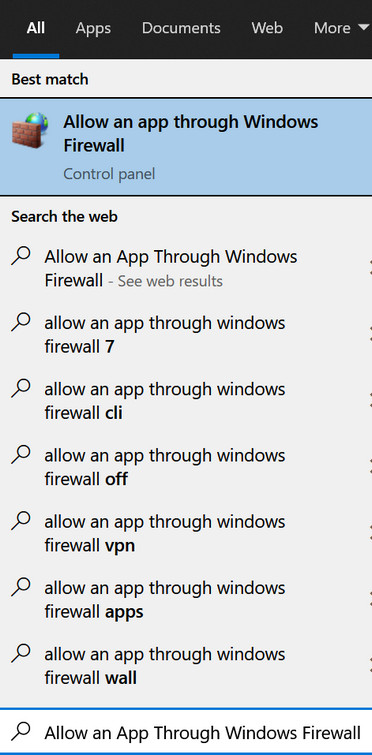
Open up Allow an App Through Windows Firewall - Now click on Change Settings & in the list of Apps, find Java (TM) Platform SE Binary. If it is not present, click on Allow Another App & steer to the installation directory of Java (usually, the Java directory of Plan Files and Program Files (X86) folders) and double-click on Javaw.exe.
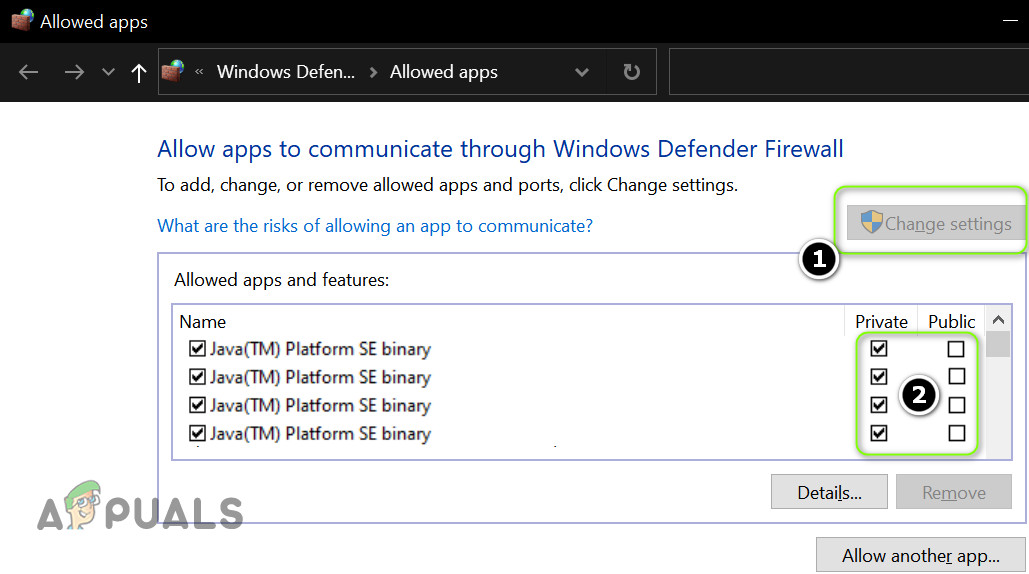
Set Java (TM) Platform SE Binary to Private - Then uncheck the choice of Public and checkmark the pick of Private for all the Java (TM) Platform SE Binary processes.
- Now select Java (TM) Platform SE Binary & click on Details.
- So open Network Type and checkmark Private.
- Now utilise your changes & reboot your PC.
- Upon reboot, cheque if the IOexception issue is resolved.
Allow the Minecraft Through the Firewall
- Click Windows, type: Firewall, & open Windows Defender Firewall.

Open Windows Defender Firewall - Now make certain no Inbound and Outbound rules related to Minecraft are set to Block the Connection.
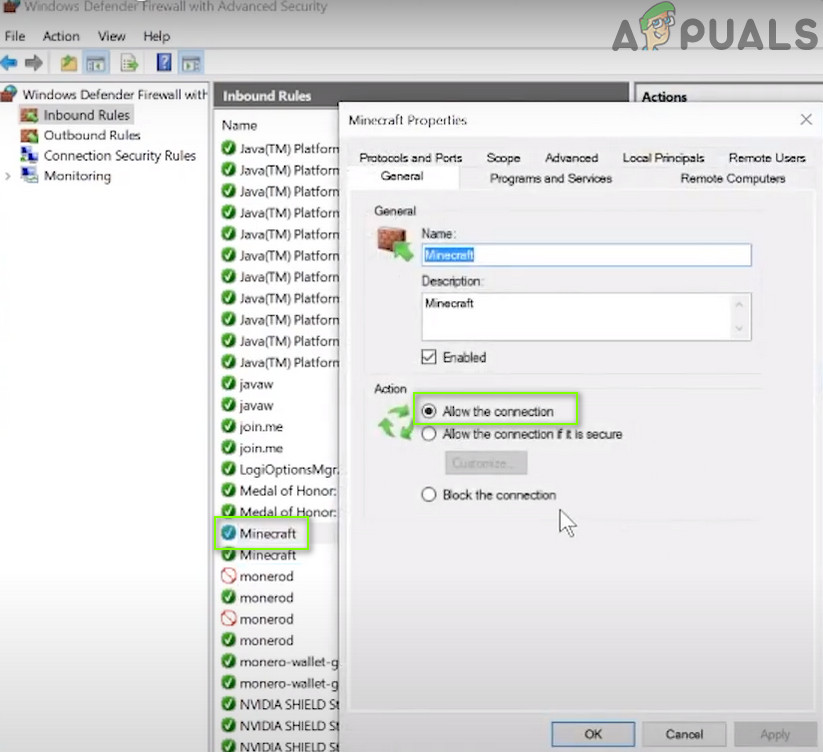
Allow the Minecraft Connection Through the Windows Defender Firewall - Then select Entering Rules & click on New Dominion.
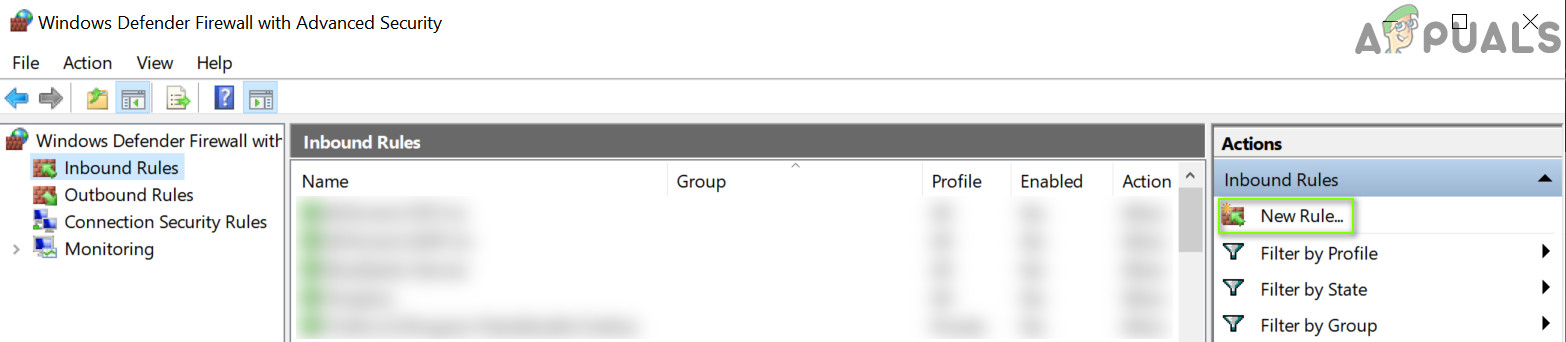
Create a New Inbound Rule - At present select Program & click on Next.
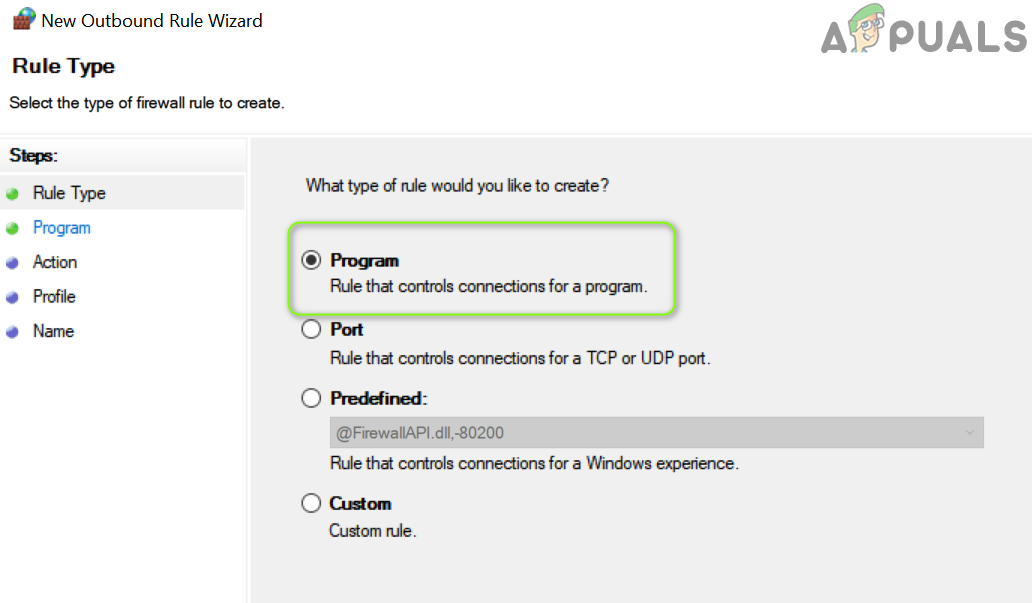
Select Program in New Dominion Window - Then click on Browse & steer to the installation directory of Minecraft.

Open Browse and Steer to The Installation Directory of Minecraft - Now double-click on Minecraft.exe & select Let the Connexion.
- Then click on Next & select all the 3 profiles (i.eastward., Public, Individual, & Domain).
- At present proper noun the rule & click on Finish.
- So repeat the same for the Outbound Dominion & reboot your PC.
- Upon reboot, bank check if the Java.io result is resolved.
If the effect persists, cheque if allowing the Minecraft connections through the router's Firewall (if whatsoever) resolves the result (specially, if it is using some autoblocking feature). If that did not do the trick, cheque if the parental controls are not restricting the Minecraft access. Also, it will be a good idea to ensure that the ports are properly forwarded in the organization/router firewall equally required by Minecraft.
If the outcome persists, bank check if allocating more RAM to Minecraft solves the problem. If that did not do the trick, yous may contact the server'southward admins to delete your player data or check for a server-side trouble. If the issue did not resolve then far, yous may have to perform a factory reset of your PC & if that did not practice the trick, go your system (peculiarly, hd and network/Wi-Fi card) checked for a hardware error.
![]()
Executable File Is Not Found. Clear Command Option in the Launcher Settings and Try Again
Source: https://appuals.com/how-to-fix-internal-exception-java-io-ioexception-in-minecraft/
0 Response to "Executable File Is Not Found. Clear Command Option in the Launcher Settings and Try Again"
Post a Comment